


community.livejournal.com/.../

into:
 or
or 
Program: GIMP 2.6.7
Translatable: Yes
Uses: Layer Masks, Color Balance, Color Curves, Gaussian Blur, Black & White (optional) Textures (optional)
Difficulty: Moderate
Steps: Five - Eight
PSD: No
Step One: Get the two photos you want to blend together into one "base". I, for example, have these two of AnnaSophia Robb and Josh Hutcherson in The Space Between and The Kids Are All Right, respectively.

I wouldn't reccommend doing anything to "prepare" your base photos (i.e. sharpening, darkening, lightening, etc.) for this particular tutorial. The reason being is because we're going to be trying so hard to make two rather different pictures look like they're one and the same, so we don't want to fiddle with anything, as we may mess up a potential "meshing aspect".
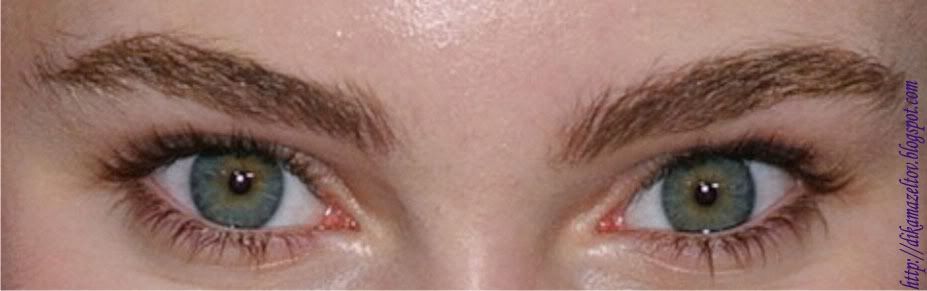
Step Two: Now we're starting in on the actual blending process! Firstly, we need to get both photos into the same "project". To do this, I copied and pasted my photo of AnnaSophia onto Josh's, anchored it to it's own layer, and then moved it around until it was where I liked it. I put her on top of him for quite a few reasons: reason number one being that his photo is the larger of the two. Two, he has a good amount of negative space in his photo. And three, because putting her on top of him allows us to easily get rid of the other woman in her photo. After I got everything situated the way I liked it, I changed her layer mode to "Screen" opacity 100. This allows us to be able to see through to Josh's picture. However, there's a good deal of leftover media from AnnaSophia's picture on his face. To fix this, I added a layer mask to her layer and ended up with this:

Step Three: Okay, so we can see both of them now. But the downside is that AnnaSophia is really washed out and unnatural looking. To fix this, I duplicated her layer and changed the mode to "Lighten Only", opacity 100. This makes her just a bit darker and adds a bit of her background to Josh's.

Step Four: AnnaSophia's still way too washed out. Plus, the little lights from Josh's photo bleeding into her face don't look good at all. To get rid of them, I duplicated her layer and set it to "Darken Only", opacity 100. This makes her more prominent, gets rid of the lights, and blends the photos together better. A bit too much of her picture bled onto Josh's, so I went back over those parts on the layer mask.

Step Four: I think we can all agree right now that the coloring on Josh's half is really dark and ugly.AnnaSophia's, however, is actually quite pretty. Since I want this to look like an actual screencap, I decided to alter the color of Josh's picture to better match AnnaSophia's. To do this, I duplicated the background layer, (his photo) and dragged it to the top. Then, I added a layer mask and erased all the parts covering up Anna. After that, I fiddled around with the midtones settings on Color Balance to add more reds, yellows, and a bit of greens. I also used the value channel on Color Curves to make it a bit brighter. Also, since I was really picky about the match, I used curves a bit on a few AnnaSophia layers. I won't bore you guys with the actual numbers, since the numbers and tones will be dramatically different for each one. But know that Color Balance and Curves are your best bet! I ended up with this in the long run:

Step Five: I wasn't crazy about the bit of grain in both of the pictures and the messy edges of the blending. I found a quick fix for this. Go up to "Layer" and click on "New From Visible". I then went and applied Gaussian Blur and fiddled with the settings (I think I ended up with a 5, but I'm not sure). Since It was still a bit too strong, I changed the layer mode to "Soft Light", opacity 20.
Step Six: Technically, you can stop after step five. However, if you want to add a bit more decoration, keep going! I decided I wanted a bit of a "flashback" to when they were younger. To do this, I got a still of Josh when he was younger, in a movie called Bridge to Terabithia. I pasted the still onto the picture, anchored it to it's own layer, and moved it around to where I liked it. Then I desaturated it. I added a layer mask, but thought it was still a bit too prominent. To fix that, I changed the layer opacity to 30, then duplicated it and changed the mode to "Screen" with no difference in opacity. It gave it a faded look without being impossible to see. After that I did the exact same thing with a Terabithia picture of AnnaSophia.

Step Seven: I wanted something a little bit more, do I took a texture (as you can see below) and pasted it onto the image, changing the mode to "Overlay" and the opacity to 40. It was something interesting to look at and gave some color continuity as well.


Step Eight: And last but not least, I added some text. Using the font "Windsong", I changed the layer mode to "Grain Merge", opacity 60.
And that's it! :) I'd love comments and results. I also included another example down below.
into:
or Program: GIMP 2.6.7
Translatable: Yes
Uses: Layer Masks, Color Balance, Color Curves, Gaussian Blur, Black & White (optional) Textures (optional)
Difficulty: Moderate
Steps: Five - Eight
PSD: No
Step One: Get the two photos you want to blend together into one "base". I, for example, have these two of AnnaSophia Robb and Josh Hutcherson in The Space Between and The Kids Are All Right, respectively.
I wouldn't reccommend doing anything to "prepare" your base photos (i.e. sharpening, darkening, lightening, etc.) for this particular tutorial. The reason being is because we're going to be trying so hard to make two rather different pictures look like they're one and the same, so we don't want to fiddle with anything, as we may mess up a potential "meshing aspect".
Step Two: Now we're starting in on the actual blending process! Firstly, we need to get both photos into the same "project". To do this, I copied and pasted my photo of AnnaSophia onto Josh's, anchored it to it's own layer, and then moved it around until it was where I liked it. I put her on top of him for quite a few reasons: reason number one being that his photo is the larger of the two. Two, he has a good amount of negative space in his photo. And three, because putting her on top of him allows us to easily get rid of the other woman in her photo. After I got everything situated the way I liked it, I changed her layer mode to "Screen" opacity 100. This allows us to be able to see through to Josh's picture. However, there's a good deal of leftover media from AnnaSophia's picture on his face. To fix this, I added a layer mask to her layer and ended up with this:
Step Three: Okay, so we can see both of them now. But the downside is that AnnaSophia is really washed out and unnatural looking. To fix this, I duplicated her layer and changed the mode to "Lighten Only", opacity 100. This makes her just a bit darker and adds a bit of her background to Josh's.
Step Four: AnnaSophia's still way too washed out. Plus, the little lights from Josh's photo bleeding into her face don't look good at all. To get rid of them, I duplicated her layer and set it to "Darken Only", opacity 100. This makes her more prominent, gets rid of the lights, and blends the photos together better. A bit too much of her picture bled onto Josh's, so I went back over those parts on the layer mask.
Step Four: I think we can all agree right now that the coloring on Josh's half is really dark and ugly.AnnaSophia's, however, is actually quite pretty. Since I want this to look like an actual screencap, I decided to alter the color of Josh's picture to better match AnnaSophia's. To do this, I duplicated the background layer, (his photo) and dragged it to the top. Then, I added a layer mask and erased all the parts covering up Anna. After that, I fiddled around with the midtones settings on Color Balance to add more reds, yellows, and a bit of greens. I also used the value channel on Color Curves to make it a bit brighter. Also, since I was really picky about the match, I used curves a bit on a few AnnaSophia layers. I won't bore you guys with the actual numbers, since the numbers and tones will be dramatically different for each one. But know that Color Balance and Curves are your best bet! I ended up with this in the long run:
Step Five: I wasn't crazy about the bit of grain in both of the pictures and the messy edges of the blending. I found a quick fix for this. Go up to "Layer" and click on "New From Visible". I then went and applied Gaussian Blur and fiddled with the settings (I think I ended up with a 5, but I'm not sure). Since It was still a bit too strong, I changed the layer mode to "Soft Light", opacity 20.
Step Six: Technically, you can stop after step five. However, if you want to add a bit more decoration, keep going! I decided I wanted a bit of a "flashback" to when they were younger. To do this, I got a still of Josh when he was younger, in a movie called Bridge to Terabithia. I pasted the still onto the picture, anchored it to it's own layer, and moved it around to where I liked it. Then I desaturated it. I added a layer mask, but thought it was still a bit too prominent. To fix that, I changed the layer opacity to 30, then duplicated it and changed the mode to "Screen" with no difference in opacity. It gave it a faded look without being impossible to see. After that I did the exact same thing with a Terabithia picture of AnnaSophia.
Step Seven: I wanted something a little bit more, do I took a texture (as you can see below) and pasted it onto the image, changing the mode to "Overlay" and the opacity to 40. It was something interesting to look at and gave some color continuity as well.
Step Eight: And last but not least, I added some text. Using the font "Windsong", I changed the layer mode to "Grain Merge", opacity 60.
And that's it! :) I'd love comments and results. I also included another example down below.


0 komentar:
Posting Komentar